10. Use jewelry pliers to add jump rings, connecting any of your dangle style earrings that need to be connected. Carefully pry open the ring, slip 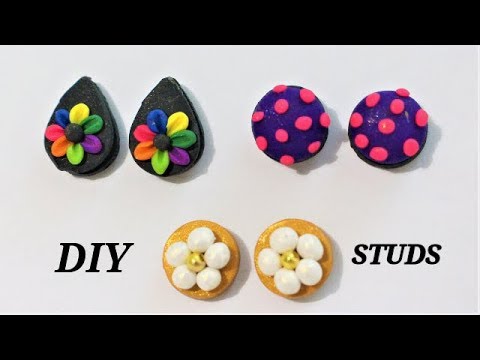 Polymer Clay Earring Designs 1 Arch Earrings 2 Rainbow Earrings (rope arch) 3 Simple Stud Earrings 4 Easy Clay Hoop Earrings 5 Twist Hoop Earrings 6 Floral Pattern Slab Earrings 7 Abstract Marble Pattern 8 Simple Drop Circles 9 Orange Shaped Clay Statement Earrings 10 Cutout Clay Earrings More items This creates a putty-like clay which can be molded, stamped, impressed, cut, extruded, sculpted, rolled, brushed, etc., into whatever shape or form you desire. Add this fresh summer fruit to your ears and be ready to stand out of the crowd. Add gold leaf to the polymer clay. Form into a ball. First, place the clay earring cutters over the clay and press down, you can get the nice shapes, then make earrings with tools. Take the Class. 7. Since polymer clay forms a nice, durable finish when it cures, sealing your beads isnt necessary. Take a few of white clay and rub it as rod-shape. Use the temperature listed on the package instructions, but bake for an hour to make sure they're fully cured. Make the watermelon body
I love crafting jewelry using clay cutters. 3. Fourth layer: 1 circle *3. Basically, microscopic particles of pure silver (or gold) are embedded into an organic binder. This clay can be used in jewelry making. Bake the rainbows to cure the clay. With the backside of a spoon, gently thin the edges even more. 1. As you are gathering your materials, consider the colors that you'd like to combine to create your earrings. Think about a color palette tha This involves creating designs on Vectornator and making templates on a Silhouette Portrait 3 machine using plastic notebook dividers Ive found around my house. Im able to design and 8. If you are creating multi-piece earrings (also known as dangle earrings), you'll need to add holes to connect the pieces with jump rings. Us Third layer: 3/4 of a circle *3. DIY alcohol ink earrings Rolling out white polymer clay 1. Yes, but you will obviously need to paint it or add coloring if you arent looking for all-white earrings or miniatures. Features:If you want to make your home more beautiful and colorful, the Diamond Painting can help you add the gaiety decoration.DIY painting, originality, painting and resin sequins, the resin sequins dazzling, unique luster, shining light, is the most popular DIY jewelry at present.Colorful diamond Minion:Diamond Rexx - Wizard101 Wiki. 5. Flattening the ball into a circle Then, flatten into a circle. Press your jewelry mold on the clay to cut the clay into shapes. Once you have determined the design of the earring, you will need to cut off a chunk of clay from the color you've chosen. Time: 15 minutes. Using a small piece of silver metal clay, roll it into a sausage shape using a flat acrylic block. Put one square to the side for safekeeping in case you need extra later. Open a jump ring and place the clay and one end of the chain on it. Close the jump ring. Roll these balls flat so theyre the same thickness as the base. Break off a pea-sized piece of white clay and about a quarter of that size of colored clay and mix them together until they make a consistent lighter hue. CUTTING EARRING SHAPES Do the same process to other red clay mushroom-tops. Open a jump ring and place the clay and one end of the chain on it. Using a small piece of Sculpey, form an orb by rolling the clay between your hands. Then the sewing begins! As you are gathering your materials, consider the colors that you'd like to combine to create your earrings. As you can see, she has a strong affinity for color. 2. Fray. I wrote last week about my latest attempts to design and create unique polymer clay earrings. Hold the pliers around the wire, slightly above the top of that bead to create a little bit of breathing room. Steps to make clay earrings Step 1: Condition the clay Conditioning the clay means making it soft for the process, it is generally done by kneading the clay so that it can be softer, flexible, and easier to shape. Add this fresh summer fruit to your ears and be ready to stand out of the crowd. Thanks for watching be sure to like,comment and subscribe!Art studio Design 1 Using the warmth from your fingers and palms to soften it, roll the clay around to soften and stretch it. Bake your clay on a cookie sheet following the instructions on the Sculpey package. Polymer Clay Woodland Mushroom Earrings. Close the earring loop. Apply corn starch to cookie cutters, to prevent clay from sticking to 1st Layer: 1/4 of a circle +1/2 of a circle +3/4 of a circle. Step 3. You want them thick enough to hold their shape after being cured in the oven. Glue stud earring backs to your baked clay shapes. Jewelry making clay dries in air. Roll out the polymer clay Roll a white piece of clay until it's around 2mm (0.08 inches) thick. Roll out your clay until it is 1/4 in. Wait one hour and turn them over and spray the back to finish making a waterproof seal. Cutters are an excellent tool for creating jewelry made from polymer clay. Second layer: 1/2 of a circle *2. Take the piece of clay and warm it up in your hands a little bit, and then lay it into a flat surface to roll out. Juicy, bright, and colorful pair of cute clay earrings are enough to lighten your summers. You can use hot glue, but Ive found that its not the sturdiest option. This involves creating designs on Vectornator and making templates on a Silhouette Portrait 3 machine using plastic notebook dividers Ive found around my house. Lemon tends to have more side effects than benefits for the skin, making this a risky DIY option for home skin care. Start by rolling a small pinch around in a ball, and then with the clay in between your fingers, squish the clay to form a round circle. Lay the pieces on on a cutting board and add a drop of mineral oil. By wrapping the wire around the pliers, we are creating that loop. Coat your beads. This involves creating designs on Vectornator and making templates on a Silhouette Portrait 3 machine using plastic notebook dividers Ive found around my house. Using a rolling pin or clay roller, roll a piece of red polymer clay into 1mm flat sheet. Roll it out. Spray the pendants or beads with an even layer of water-based varnish.
Take the black plate and wrap it around the first brown clay plate, creating a singular brown-and-black plate. Sculpey Premo Granite Marble Slab Earrings. She also gently added little indentations in the clay of this piece to ensure better contact between both layers of clay. What Youll Need to Make Your Own Clay Earrings Step 1: Prepare the Clay You will need to warm the clay up a bit before you begin working with it. Y. Yael Kord. Gingerbread people make cute earrings. Im able to design and Start with 3 colors of clay in equal amounts. Cool Add a small blob of polymer clay glue between the pad of clay and the base of the stud back, as pictured below. Place tiny bits or specks of coordinating colors of clay on the rope and roll them into the rope. You can cut the snakes in half first if they are long enough so you can make two earrings from the same pieces. Instructions: 1. Let your imagination run wild. Check out our how to make polymer clay earrings selection for the very best in unique or custom, handmade pieces from our dangle & drop earrings shops. The run it through your clay roller. I use an acrylic rolling pin to roll the clay, but you can also use a pasta maker. How To Bake Polymer Clay Earrings. Pick up one of the red mushroom-top and make contacts to it with the white clay slightly so as to leave white spots on the surface of it. Mixing white and pink polymer clay Take two pieces of polymer clay, roll them into two separate thin lines, then twist them around each other and press to make a mixed color clay. High quality Austrian crystals are now available under the PRESTIGE Crystal Components line. 7. Instructions. Place the other end of the chain on the open earring loop. Holes are poked through the clay before baking. 3. Start by rolling out your clay flat with a rolling tool. That means the water is gone and its ready. Use the Xacto knife and other materials to design your perfect ring. Once its nice and flat without any bubbles, go ahead and press your shapes. Note: If desired pattern is not apparent, ball up clay again to move material around. Transfer the parchment paper onto a baking sheet and bakethe polymer clay in the oven according to the package. Use your hands to stretch out a 1/2-inch piece of white clay until its warm, soft and malleable. While this tutorial is best suited for those with some familiarity of polymer clay sculpture, novice sculpters should be able to follow along given a little effort. Cut out the rainbows, leaving a white border all the way around. It was traditionally used as a storytelling technique and is now used to make jewelry and sculptural artwork. Now with the precision knife or metal cutters (even cookie cutters if you find small ones), cut out the shapes you want. B. Cut the brown clay plate in half, creating two squares. Use a circle cutter to make two circles. Make a hole with a toothpick to attach the findings. Then set aside. After drying, the clay is then fired, either with a torch or a kiln. Make a simple pair of earrings with polymer clay beads. If you are gluing earrings posts, I highly recommend Gorilla Glue GEL. Keep going until you have a nice assortment of sizes. Step 11. If you are using hooks rather than earring posts, make sure to use the toothpick to create a hole at the top of the circle. To begin, cut about a quarter of the clay from the block and set the rest aside. Place the conditioned and colored clays on a baking tray covered with parchment paper. Pro Tip 1: Use the same brand of clay throughout, especially if youre mixing colors.
Creativity UnlimitedComplete clay cutters and polymer clay kit to make beautiful and unique earrings, keychains, rings, necklaces. Use the plastic squeegee (provided in your mold packaging) to remove any excess clay. Remove your molds and squeeze the liquid clay to fill. 1. From into a ball and set aside. (The directions for baking may vary based on the brand of clay you purchase and your clays thickness, so check the package before heating the oven up.) To create the loop, we will use round nose pliers. Using your template, cut around the square with a knife: You then fold up one side of each corner and firmly push it into the middle. Peril was growing impatient with Clay.
Glue flat-back pearls to the ends of the rainbow to make clouds. You can do whatever you want! Repeat the process for the second earring to match and thats it for the dangle earring option. Use gorilla super glue to attach the post to the back of the clay shape. How thick should you roll clay for earrings? Keep repeating this process, kneading the clay until the texture changes from cracked and dry, to supple and flexible. Studs: To make stud earrings, all you need are posts and backs. How to make red roses earrings from polymer clay $ 25.00 $ 18.75. Pick out the different colors you want your earrings to be and section off some clay from each color block. Polymer clay earrings can be made in so many different ways! Here's one option. Start by softening your clay in clean hands. Knead it until it is soft enough to roll. They are insanely cute and super easy to make yourself! I dont think this is super strong so I wouldnt use it for delicate work. Join it at the base and curl the edge slightly outward. Watermelon Polymer Clay Earrings. FIVE other people have gone missing in the last 15 years near where a Brit hiker vanished, officials revealed yesterday. 4. Alternate directions to make the slab even. Take the earring hook and open the loop on the end with the pliers. Step. Dark Red Succulent. How to Make DIY Statement Earrings with Clay. Then, peel away the excess clay. Sculpey Premo Granite Terrazzo Slab Earrings. Both sides should be black, and the brown should be tucked into the middle. Roll the polymer clay very thin. Where Do You Bake Clay Earrings? You can bake polymer clay in your home oven or even in a countertop toaster oven. Place aluminum foil on a cookie sheet and lay out your designs on the sheet. Polymer clay will not expand, so you can place them close together without touching. Fifth layer: 1 1/4 circles *5. Begin by unwrapping the clay, breaking off a piece of the clay, If using a pasta machine, use the 1 setting.
Use your acrylic roller to flatten your slab. Use your fingers and your wire comb to fray and separate the twisted strands of the macrame cord. Using a rolling pin, roll the cay out and then fold it, then roll it again. Close the jump ring. Adding diluent to the polymer clay slab 2. Place the other end of the chain on the open earring loop. Gently brush through using the comb. You can use polymer clay or air hardening clay, both of which are available or are relatively simple to obtain from your local store. Hi Friends, here I made air dry clay for jewelry making purpose . A. Form an oval with a small piece of clay. Sand each bead. I am always on the lookout for new ideas and techniques to try out. Im designing my own shapes rather than relying on purchased cutters. Hack at all the pieces with a long blade. 2nd Layer: 1 circle *3. The different formulas make it harder to figure out the correct bake time and can cause your clay to become a sticky mess. Liquid Sculpey Tassel Trio Earrings. 6. Take your stud back and skewer a pad onto the stud stem, pushing it down to the base. Roll out your clay until it is 1/4 in. First layer: 1/4 of a circle. Hot-glue embroidery floss tassels to the bottoms of the clay in the back. Marbling Technique for DIY Clay Jewelry. Use whatever color patterns you like for a totally different look. 3rd Layer: 1 1/2 of a circle *5. Use your fingertip to smooth out your shape. thick (it's okay to just eyeball it). Repeat with more petals, curling the ends slightly out. Silicone textures: FAUX LEATHER Polymer clay cutters: CUTTERS Earrings Findings: JEWELRY FINDINGS Metallic powders: POWDERS Art nail foils: Set of Foils Shell Patterns 2 pcs set Stainless Steel blades, size 4 and 8 Sculpey Premo Forest Green Coppered Earrings. Take the earring hook and open the loop on the end with the pliers. Sculpey Premo Granite Floral Slab Earrings. You can use hot glue, but Ive found that its not the sturdiest option. Twist and add in more dots of coordinating color as you like. 3. When the fruit clay earrings turn out, they really are amazing, especially in the sunset. Too many pieces will weigh down the earring and probably give you a headache. Repeat the process for the second earring to match and thats it for the dangle earring option. How to: Retro Polymer Clay Cane [Video] | Diy earrings polymer clay, Polymer clay jewelry diy, Polymer clay jewelry tutorials. 4. Now that your clay is rolled and imprinted, you can cut shapes from the clay. Imprinted clay works really well for a stud-style earring. To crea Stack these ropes into a two-by Make gorgeous polymer clay jewelry with instruction and inspiration from polymer clay designers Ilysa Ginsburg and Kira Slye. It's a fun and easy DIY project. Shape the rose petals (picture 3--8) This is the most crucial step for a realistic polymer clay rose. Ive heard people play around with resin, but it can get super expensive and messy! Yes, but you will obviously need to paint it or add coloring if you arent looking for all-white earrings or miniatures. Step 4 Can You Make Clay Earrings With Air Dry Clay? Shape and arrange the succulent leaves based on the pictures below. Next, Ill transfer the handmade designs onto a baking tray lined with aluminum foil and then set the oven to 275 degrees, as per Sculpeys instructions.