Click on the Upload button and wait for a while. More accurate the voltage, more higher the accuracy! The ground of the pH sensor is connected with the ground of the Arduino Nano. 3. 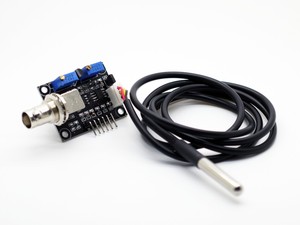 Analog pH sensor is designed to measure the pH value of a solution and show the acidity or alkalinity of the substance. Arduino Sample Code My value was a little off thats why I subtracted 0.7. Ph Senor Arduino Interfacing Tutorial | Working, Calibration Method & Code, Copyright 2022, All Rights Reserved | How To Electronics, Please consider supporting us by disabling your ad blocker, DIY Ph Meter using PH Sensor & Arduino with OLED Display, #define SensorPin A0// the pH meter Analog output is connected with the Arduinos Analog, //Store the average value of the sensor feedback, //Get 10 sample value from the sensor for smooth the value, //take the average value of 6 center sample, #define SensorPin 0// the pH meter Analog output is connected with the Arduinos Analog, #define SCREEN_WIDTH 128// OLED display width, in pixels, #define SCREEN_HEIGHT 64// OLED display height, in pixels, #define OLED_RESET-1// Reset pin # (or -1 if sharing reset pin), LoRa Based Wireless Weather Station with Arduino & ESP32, How 433 MHz RF Module Works & Interfacing with Arduino, RFID Based Attendance System using Arduino, RTC & LCD Display, Fingerprint Based Biometric Attendance System using Arduino, https://www.youtube.com/watch?v=eCxrU_tfb9w, IoT Based Patient Health Monitoring using ESP8266 & Arduino, Interfacing MAX30100 Pulse Oximeter Sensor with Arduino, IoT Based Electricity Energy Meter using ESP32 & Blynk, ECG Graph Monitoring with AD8232 ECG Sensor & Arduino, Password Based Door Lock Security System Using Arduino & Keypad, Measure Soil Nutrient using Arduino & Soil NPK Sensor, Temperature Based Fan Speed Control & Monitoring With Arduino, Interface Capacitive Soil Moisture Sensor v1.2 with Arduino, Arduino CAN Bus Tutorial | Interfacing MCP2515 CAN Module with Arduino, Interfacing 5MP SPI Camera with ESP32 WiFi Module, Interfacing 5MP SPI Camera with NodeMCU ESP8266, Arducam | Interfacing 5MP SPI Camera with Arduino UNO, IoT Based Drinking Water Quality Monitoring with ESP32, Home Automation using Amazon AWS IoT Core & ESP32, Control Relay/LED/Lamp with AWS IoT Core using ESP32, ESP32 DW1000 UWB Indoor Location Positioning System, Hardware filtered output signal, low jitter. pH Meter using Arduino Uno and LCD Display, AMF Series 18/24/36 W Medical AC-DC Adaptors, TPP 180 and TPI 180 Medical and Industrial AC/DC Power Supplies, NTS/NTU Series Reliable, Safe, and Durable DC-AC Pure Sine Wave Inverters, IsoMOV Series Hybrid Protection Component. Accepted English & Vietnamese language: sensor / cm bin, humidity / m, Cm bin pH Gravity: Analog pH Sensor / Meter Kit For Arduino, ng c khng gim tc DC Non Geared Motor, Quy trnh kim tra xc minh tnh trng bo hnh Raspberry Pi, Hng dn ci t h iu hnh cho Raspberry Pi, [COVID-19] Hshop.vn tm ngng hot ng t ngy 31/07/2021 cho n khi c thng bo tip theo, Hshop.vn l i l y quyn chnh thc ca Waveshare ti Vit Nam. Your email is safe with us, we dont spam. Again I started with the Distilled water and waited for around 30 minutes to check if there can be any fluctuations in the pH value. The unit that we use to measure the acidity of a substance is called pH. After successful hardware connections, now its time for programming the Arduino. Sample code for testing the PH meter and get the sensor feedback from the Arduino Serial Monitor. make the value 21.34 + 0.5=21.84. Copyright 2022Circuit Digest. Comes in compact plastic box with foams for better mobile storage. I may make a commission if you buy the components through these links. This is the analog pH sensor kit from the DIY MORE which is a bit different from the one developed by the DFrobot. When the probe is dipped into the solution to be tested, hydrogen ions in the test solution start exchanging with other positively charged ions on the glass membrane, which creates an electrochemical potential across the membrane which is fed to the electronic amplifier module which measures the potential between both electrodes and converts it to pH units. Nevertheless, I am sharing for whom anyone proceed it without display. Do you have code for v2? Any ideas? (Gi lm vic/Working time: T2-T7/Mon-Sat 8h00~17h30), Cm bin pH DFRobot Gravity: Analog pH Sensor / Meter Kit For Arduino. i also getting multiple erros regarding simple timer library. Electrode blub or sand core is defiled which will make PTS decline, slow response. Once the reading matches, you can stop rotating and hence the sensor is calibrated. Anyone have a solution? I found a code for v2 in dfrobot forum but it has no oled display. So make sure to calibrate the pH sensor whenever you switch between the different Arduino boards. Random Secret Coupon for Any Order Over $500 Before 24th December 2020. pH Electrode Manual It has two LEDs which work as the Power Indicator, a pH sensor, a BNC connector. I started off by connecting the external part of the BNC connector with the center of the BNC probe connector. I used the distilled water.
: In function void setup(): sketch_apr19a:32:40: error: no matching function for call to SimpleTimer::setInterval(long int, void (&)()) timer.setInterval(500L, display_pHValue); ^ note: candidate: void SimpleTimer::setInterval(uint64_t) void setInterval(uint64_t interval); candidate expects 1 argument, 2 provided In function void loop(): sketch_apr19a:35:9: error: class SimpleTimer has no member named run timer.run(); // Initiates SimpleTimer ^~~, no matching function for call to SimpleTimer::setInterval(long int, void (&)()), Here is a link to download the simpletimer library https://www.electroniclinic.com/wp-content/uploads/2019/08/SimpleTimer.zip. pH meter Arduino, pH Meter Calibration, DIYMORE pH Sensor Arduino Code, Click to share on Twitter (Opens in new window), Click to share on Facebook (Opens in new window), Click to share on WhatsApp (Opens in new window), Click to share on Telegram (Opens in new window), Click to share on Tumblr (Opens in new window), Click to share on LinkedIn (Opens in new window), Click to share on Reddit (Opens in new window), Click to share on Pinterest (Opens in new window), Click to share on Pocket (Opens in new window), Click to share on Skype (Opens in new window). GPKKD s: 41K8019734 do UBND Qun 11 cp ngy 06/12/2017. Hello Engr. J1 is the female DC power jack and this is where we connect the input power supply. coming or is it already available? Simply copy the code and upload it to the Arduino Board. Out of these 6 pins we will only use 3 pins; V+, G, and Po. To learn more about the Ph Sensor you can check the DfRobot official article here: Gravity: Analog pH Sensor/Meter Kit V2. The first thing to do in the program is to include all the required libraries. My recommendation is go for the DFrobot pH sensor. This function is controlled using the timer. In this basic tutorial, we will learn how to interface Gravity Ph Sensor with Arduino. Record the pH value printed,then compared with 7.00, and the difference should be changed into the "Offset" in the sample code. You can add a few more extra sensors to this project like TDS Sensor, Turbidity Sensor & Dissolved Oxygen Sensor for Water Quality Monitoring. Before the electrode in continuous use every time,you need to calibrate it by the standard solution,in order to obtain more accurate results.The best environment temperature is about 25 ,and the pH value is known and reliable,close to the measured value. So, connect the VCC pin to 5V of Arduino and GND to GND.
Probe Life: >0.5 years (depending on the frequency of use), After completing the measurement, disconnect the. Th 2 - Th 7: 8h00 n 17h30, Ch Nht ngh. If you want an IoT Based Ph Meter, you can follow the IoT pH Meter Tutorial and make it work with ESP32 & Thingspeak Server. Que o (Probe) ca cmbin ch s dng trong phng th nghim, ly mu trong thi gian ngn, khng s dng mi trng thc ttrong thi gian di,u que ocn c ra sch sau mi ln o v bo qun trong dung dch KCL3N (mua cc ca hng ha cht th nghim, khng i km sn phm). The next two pins are the ground pins, you can connect any of these two pins with the Ground pin of the Arduino. I downloaded the library simpletimer but i have the same problem. pH scale is used to measure the acidity and basicity of a liquid. Connect the ground pin of the interface circuit with the ground pin of the Arduino, and finally connect the analog output pin Po with the A0 pin of the Arduino. For testing the Ph meter designed above, I used 4 different solutions with different Ph value. Finally, I started off by placing the components and completed the soldering Job. The area on the right side can be used as the Vero Board for soldering other electronic components. With this Ph Sensor, you can quickly build the pH meter to measure the Ph value of the different aqueous solutions. The term H is defined as the negative log of the hydrogen ion concentration. Zips For All Above Here comes an analog pH meter, specially designed for Arduino controllers and has built-in simple, convenient and practical connection and features. I added female headers for the 3.3V, 12V, 5V, and ground. Milk: Ph Value is around 6.5 to 6.7 I also added lemon juice to the Milk to check if the value will drop. Next, I cleaned the pH sensor probe to measure the pH value of the Malik. (3)Put the pH electrode into the standard solution whose pH value is 7.00or directly shorted the input of the BNC connector.Open the serial monitor of the Arduino IDE,you can see the pH value printed on it,and the error does not exceed 0.3. You will need the following libraries in order to print the pH values on the Oled display module. (5) According to the linear characteristics of pH electrode itself, after the above calibration,you can directly measure the pH value of the alkaline solution, but if you want to get better accuracy, you can recalibrate it. Po is the Analog output pin, which should be connected with the analog pin of the Arduino. If you remember I did all the testing with Arduino Uno, but this time I am using the Arduino Nano. For example, it can be used in a swimming pool to check the quality of water. Thank you very much. float calibration_value = 21.34 0.7; //21.34 0.7, #define SCREEN_WIDTH 128 // OLED display width, in pixels, #define SCREEN_HEIGHT 64 // OLED display height, in pixels, // Declaration for an SSD1306 display connected to I2C (SDA, SCL pins), #define OLED_RESET -1 // Reset pin # (or -1 if sharing Arduino reset pin). 7 pH is for neutral substances that are neither acidic nor basic. To use it, just connect the pH sensor with BNC connector, and plug the PH2.0 interface into the analog input port of any Arduino controller. Again I started with the testing. IP22 rated medical & home-healthcare 18/24/36W AC-DC adaptors with interchangeable AC plugs. Disconnect the Arduino board and also remove the wire. Thanks for sharing. The electrode plug should be kept clean and dry. Note:If you want to measure the pH value of other solution,you must wash the pH electrode first! . Similarly, Ph Sensor has a wide range of applications like wastewater treatment, pharmaceuticals, chemicals & petrochemicals. Very interesting & neat project. Due to this wide range of input voltages it can be used with 5V and 3.3V compatible controller boards like Arduino, ESP32, and ESP8266 etc. Complete code and demonstration Videoaregiven below. After making these changes, again upload the code to Arduino and recheck the pH by dipping electrode in the reference solution. Next I added some lemon juice to the water and I was amazed with the result. 4. Then to calibrate it, just add 7-6.5=0.5 in the calibration variable calibration_value in the code. We also offer ideas and solutions for students, organizations and Industries and also provide them with the required training in different fields. The ph of milk is between 6.5 to 6.7. PCB Design layout I have also used the same Diymore pH Sensor with the ESP32 and built an IoT pH Meter. If your value is different then you can adjust this value. The biggest problem while using the Ph Sensor is about the calibration. I started off by calibrating the pH sensor using the Arduino board, once the pH sensor perfectly calibrated, then I started by measuring the pH value of the distilled water and displayed the values on the serial monitor. Connect the Analog pin of Ph Sensor to Arduino A0 pin and supply 5V to it. Calibration of the PH electrode is very important in this project. The following line of code is used to calibrate the value. Connect its analog pin to A0 of Arduino as shown in image above. If pre-programmed, you will get the pH value easily. With a perfectly blended team of Engineers and Journalists, we demystify electronics and its related technologies by providing high value content to our readers. Soap Water: Ph value is around 9-10 Inside setup (), LCD commands are written for displaying a welcome message on LCD. Please try viewing the page through computer. The connection is fairly simple again. We are done with the calibration and now its time to display the pH value on the Oled display module as it seems quite impractical to use the laptop or computer. This electrode design ensures an environment with the constant binding of H+ ions on the inside of the glass membrane. Cm bin pH DFRobot Gravity: Analog pH Sensor / Meter Kit For Arduinoc s dng o pH trong mi trng nc, cm bin bao gm mt que o (Probe) v mch x l, khuch i tn hiu c th cho ra tn hiu Analog c th c bng ADC ca Vi iu khin. Lemon Juice: Ph Value is in between 2 to 3, Once the code is uploaded to Arduino Board, you can open serial monitor and start testing the Ph Sensor. Thank you very much for the wonderful data and video about the pH sensor. Now, pH plays a very important role in our lives and it is used in various applications. How would I calibrate my pH sensor in this case? Thng tin sn phm c Hshop.vn t xy dng, nu s dng xin vui lng ghi r ngun, xin cm n! Need to measure water quality and other parameters but haven't got any low cost pH meter? Then this average value is converted into actual pH value and printed on an LCD display. Besides this, you will also get a 30 Dollars Coupon balance, which you can use to get yourfirst prototype order for free. If you worked with PH metering before you will know that PH values range from 0-14. timer.run() i am getting for this line error: class SimpleTimer has no member named run. Note: In my case I used Milk for calibrating the sensor as I didnt have any buffer solutions. (1)Connect equipments according to the graphic,that is,the pH electrode is connected to the BNC connector on the pH meter boardand then use the connection lines,the pH meter board is connected to the ananlong port 0 of the Arduino controller. Now let us interface Ph Sensor with Arduino using Simple Arduino Code. This causes a 2.5 volts tension on the Po analog output pin. All the components can be easily purchased from Amazon. How to Electronics is an electronics engineering community built and run by passionate electronics engineers. As you know the pH value of the lemon juice is 2, and the value on the display as you can see is almost 2. Hi, thank you for the diagram and code. The last pin is the To which is the temperature output. After adjusting the value, I was able to get the exact pH value for the distilled water. The stepwise explanation of the project is given below. For this, we need to have a solution whose value is known to us. Measurement should be avoided staggered pollution between solutions, so as not to affect the accuracy of measurement.
After the program has been uploaded. Before I am going to explain how to calibrate and use this pH Sensor kit from the DIY MORE, first a few words about the sponsor of this article for sending me high-quality PCBs. The V+ pin of the pH Sensor is connected with the 5V. I note in the introduction to your great video at https://www.youtube.com/watch?v=eCxrU_tfb9w you mention . As you can see the quality is really great, the silkscreen is quite clear, and the Blue color solder mask looks amazing. The range of pH can have values from 0 to 14. For the step by step explanation watch video tutorial given below. Values lower than 7 are acidic and values greater than 7 are basic or alkaline. Both of them are connected with each other. The purpose of this program is to the read the analog output pin Po and display the voltage on the serial monitor. The above code is already adjusted. Finally, we will learn the calibration method which will determine the correctness and accuracy of the sensor. 2. There are various buffer solutions available in the market whose PH is fixed. Similarly, adjust this variable to calibrate the sensor. The simplest method to calibrate the Ph sensor is to dip the ph electrode on the solution of known strength and observe the reading. The term PH is a quantitative measure of the acidity or basicity of aqueous or other liquid solutions. We share news, articles, projects in various electronics domains such as Embedded, Power, Analog, Digital, Audio, Internet of Thing, Artificial Intelligence, Wireless Communication, Robotics etc thus helping our readers with their projects and work. Once the code is uploaded the OLED display will start showing the value of Ph. https://wiki.dfrobot.com/Gravity__Analog_pH_Sensor_Meter_Kit_V2_SKU_SEN0161-V2, Hi. Fahad, how are you? The Ph Sensor Kit has Signal Conversion Board (Transmitter) V2 and also pH Probe. So you can also use Milk for calibration. Hence the connection diagram is shown below. The display consists of a voltmeter, which displays voltage in units of pH. Nu cn s dng trong mi trng cng nghip, cn bn v o trong thi gian di xin s dng. We have tried this Arduino pH meter by dipping it into pure water and Lemon water, you can see the result below. Ph Sensor has 3 pins that need to be connected to Arduino. Connect Arduino with the laptop to calibrate the pH sensor using the following Arduino code. On immersion in the solution to be tested, hydrogen ions in the test solution exchange for other positively charged ions on the glass bulb, creating an electrochemical potential across the bulb. In case it doesnt show the correct reading, you need to rotate the potentiometer placed on Signal Conversion Board (Transmitter) V2. The pH value can be further adjusted by changing the calibration value. hello sir .. Electrode reference solution is the 3NKCL solution. So we are going to set it to 2.5 volts using the trimmer. Before the pH electrode measured different solutions, we need to use water to wash it. The 5V regulated power supply based on the LM7805 linear voltage regulator is used to power up the Arduino Nano. This equation is used to calculate the PH value of a solution as well. For example, when the electrode is dipped in a solution whose Ph Value is 7, the reading should show 7. The components purchased link is given. The output signal is being filtered by hardware low jitter. As an upgraded version of pH meter V1, the sensor greatly improves the precision and user experience. I also added female headers on the left and right sides of the Arduino Nano for connecting the jumper wires. Since the Ph sensor is an analog sensor so there is a need for calibration as the output is dependent upon the voltage. We will also learn how to calibrate the pH sensor to determine the accuracy of the sensor. I performed a series of tests using different liquids and once satisfied I further modified the code to display the pH value on the Oled display module. DFR0225 Romeo V2-All in one Controller R3, Arduino_Common_Controller_Selection_Guide, DFR0100 DFRduino Beginner Kit For Arduino V3, DFR0392 DFRduino M0 Mainboard Arduino Compatible, DFR0428 3.5 inches TFT Touchscreen for Raspberry Pi, DFR0514 DFR0603 IIC 16X2 RGB LCD KeyPad HAT V1.0, DFR0524 5.5 HDMI OLED-Display with Capacitive Touchscreen V2.0, DFR0550 5'' TFT-Display with Touchscreen V1.0, DFR0591 raspberry pi e-ink display module V1.0, DFR0604 I O Expansion HAT for Pi zero V1.0, DFR0566 IO Expansion HAT for Raspberry Pi, DFR0453 DFRobot CurieNano - A mini Genuino Arduino 101 Board, TEL0110 CurieCore intel Curie Neuron Module, DFR0478 FireBeetle ESP32 IOT Microcontroller(V3.0) Supports Wi-Fi & Bluetooth, DFR0483 FireBeetle Covers-Gravity I O Expansion Shield, TEL0121 FireBeetle Covers-LoRa Radio 433MHz, TEL0122 FireBeetle Covers-LoRa Radio 915MHz, TEL0125 FireBeetle Covers LoRa Radio 868MHz, DFR0489 FireBeetle ESP8266 IOT Microcontroller, DFR0492 FireBeetle Board-328P with BLE4.1, DFR0498 FireBeetle Covers-Camera&Audio Media Board, DFR0507 FireBeetle Covers-OLED12864 Display, DFR0508 FireBeetle Covers-DC Motor & Stepper Driver, DFR0511 FireBeetle Covers-ePaper Black&White Display Module, DFR0531 FireBeetle Covers-ePaper Black&White&Red Display Module, DFR0536 Micro bit Gamepad Expansion Board, ROB0150 Micro bit Circular RGB LED Expansion Board, SEN0219 Gravity Infrared CO2 Sensor For Arduino, SEN0226 Gravity I2C BMP280 Barometer Sensor, SEN0251 Gravity BMP280 Barometric Pressure Sensors, SEN0032 Triple Axis Accelerometer Breakout - ADXL345, DFR0143 Triple Axis Accelerometer MMA7361, Triple Axis Accelerometer FXLN83XX Series, SEN0072 CMPS09 - Tilt Compensated Magnetic Compass, SEN0224 Gravity I2C Triple Axis Accelerometer - LIS2DH, SEN0250 Gravity BMI160 6-Axis Inertial Motion Sensor, SEN0253 Gravity BNO055 + BMP280 intelligent 10DOF AHRS, SEN0246 URM08-RS485 Waterproof Sonar Range Finder, SEN0304 URM09 Ultrasonic Sensor (Gravity-I2C) (V1.0), SEN0300 Water-proof Ultrasonic Sensor ULS, SEN0301 Water-proof Ultrasonic Sensor ULA, SEN0307 URM09 Ultrasonic Sensor Gravity Analog, SEN0311 A02YYUW Waterproof Ultrasonic Sensor, SEN0312 ME007YS Waterproof Ultrasonic Sensor, SEN0313 A01NYUB Waterproof Ultrasonic Sensor, DFR0066 SHT1x Humidity and Temperature Sensor, DFR0067 DHT11 Temperature and Humidity Sensor, SEN0137 DHT22 Temperature and humidity module, DFR0023 DFRobot LM35 Linear Temperature Sensor, DFR0024 Gravity DS18B20 Temperature Sensor Arduino Compatible V2, TOY0054 SI7021 Temperature and humidity sensor, SEN0227 SHT20 I2C Temperature & Humidity Sensor Waterproof Probe, SEN0236 Gravity I2C BME280 Environmental Sensor Temperature, Humidity, Barometer, SEN0248 Gravity I2C BME680 Environmental Sensor VOC, Temperature, Humidity, Barometer, DFR0558 Gravity Digital High Temperature Sensor K-type, SEN0308 Waterproof Capacitive Soil Moisture Sensor, SEN0019 Adjustable Infrared Sensor Switch, SEN0143 SHARP GP2Y0A41SK0F IR ranger sensor 4-30cm, SEN0013 Sharp GP2Y0A02YK IR ranger sensor 150cm, SEN0014 Sharp GP2Y0A21 Distance Sensor 10-80cm, SEN0085 Sharp GP2Y0A710K Distance Sensor 100-550cm, DFR0300-H Gravity: Analog Electrical Conductivity Sensor(K=10), DFR0300 Gravity Analog Electrical Conductivity Sensor Meter V2 K=1, SEN0161-V2 Gravity Analog pH Sensor Meter Kit V2, SEN0237 Gravity Analog Dissolved Oxygen Sensor, SEN0204 Non-contact Liquid Level Sensor XKC-Y25-T12V, SEN0244 Gravity Analog TDS Sensor Meter For Arduino, SEN0249 Gravity Analog Spear Tip pH Sensor Meter Kit For Soil And Food Applications, SEN0228 Gravity I2C VEML7700 Ambient Light Sensor, SEN0017 Line Tracking Sensor for Arduino V4, SEN0212 TCS34725 I2C Color Sensor For Arduino, SEN0245 Gravity VL53L0X ToF Laser Range Finder, SEN0259 TF Mini LiDAR ToF Laser Range Sensor, SEN0262 Gravity Analog Current to Voltage Converter for 4~20mA Application, DFR0027 DFRobot Digital Vibration Sensor V2, SEN0038 Wheel Encoders for DFRobot 3PA and 4WD Rovers, DFR0052 Analog Piezo Disk Vibration Sensor, SEN0170 Wind Speed Sensor Voltage Type 0-5V, TOY0048 High Accuracy Dual Axis Inclinometer Sensor Arduino Gadgeteer Compatible, SEN0186 Weather Station with Anemometer Wind vane Rain bucket, SEN0230 Incremental Photoelectric Rotary Encoder - 400P R, SEN0232 Gravity Analog Sound Level Meter, SEN0233 Air Quality Monitor PM 2.5, Formaldehyde, Temperature & Humidity Sensor, DFR0515 FireBeetle Covers-OSD Character Overlay Module, ROB0025 NEW A4WD Mobile Robot with encoder, ROB0124 HCR Mobile Platform with Omni Wheels, ROB0128 Devastator Tank Mobile Platform Metal DC Gear Motor, DFR0265 IO Expansion Shield for Arduino V7, DFR0312 Raspberry Pi GPIO Extension Board, DFR0327 Arduino Shield for Raspberry Pi 2B and 3B, DFR0412 Gravity IO Expansion Shield For DFRduino M0, DFR0502 Gravity IO Expansion & Motor Driver Shield V1.1, DFR0518 Micro Mate- A Mini Expansion Board for micro bit, DFR0578 Gravity I O Expansion Shield for OpenMV Cam M7, DFR0577 Gravity I O Expansion Shield for Pyboard, DFR0626 MCP23017 IIC to 16 digital IO expansion module, DFR0063 I2C TWI LCD1602 Module Gadgeteer Compatible, DFR0154 I2C TWI LCD2004 Module Arduino Gadgeteer Compatible, TOY0005 OLED 2828 color display module .NET Gadgeteer Compatible, DFR0091 3-wire Serial LCD Module Arduino Compatible, DFR0347 2.8 TFT Touch Shield with 4MB Flash for Arduino and mbed, DFR0348 3.5 TFT Touch Shield with 4MB Flash for Arduino and mbed, DFR0387 TELEMATICS 3.5 TFT Touch LCD Shield, DFR0460 64x32 RGB LED Matrix - 4mm Pitch/64x32 Flexible RGB LED Matrix-4mm Pitch/64x32 Flexible RGB LED Matrix-5mm Pitch, DFR0461 Gravity Flexible 8x8 RGB LED Matrix, DFR0462 Gravity Flexible 8x32 RGB LED Matrix, DFR0463 Gravity Flexible 16x16 RGB LED Matrix, DFR0464 Gravity I2C 16x2 Arduino LCD with RGB Backlight Display, DFR0506 7'' HDMI Display with Capacitive Touchscreen, DFR0555\DF0556\DFR0557 Gravity I2C LCD1602 Arduino LCD Display Module, DFR0529 2.2 inches TFT LCD Display V1.0 (SPI Interface), FIT0352 Digital RGB LED Weatherproof Strip 60LED m*3m, DFR0645-G DFR0645-R 4-Digital LED Segment Display Module, SKU DFR0646-G DFR0646-R 8-Digital LED Segment Display Module, TEL0037 Wireless Programming Module For Arduino, TEL0087 USBBLE-LINK Bluno Wireless Programming Adapter, TEL0083-A GPS Receiver for Arduino Model A, DFR0342 W5500 Ethernet with POE Mainboard, TEL0107 WiFiBee-MT7681 Arduino WiFi Wireless Programming, TEL0112 Gravity 315MHZ RF Receiver Module, TEL0113 Gravity UART A6 GSM & GPRS Module, DFR0505 SIM7000C Arduino NB-IoT LTE GPRS Expansion Shield, DFR0057 Sensor Motor Drive Board - Version 2.2, TEL0070 Multi USB RS232 RS485 TTL Converter, SD2403 Real time clock Module SKU TOY0020, DFR0316 MCP3424 18-Bit ADC-4 Channel with Programmable Gain Amplifier, DFR0553 Gravity I2C ADS1115 16-Bit ADC Module Arduino & Raspberry Pi Compatible, DFR0117 Gravity I2C EEPROM Data Storage Module, DFR0503 Embedded Thermal Printer - TTL Serial, DFR0563 Gravity 3.7V Li Battery Fuel Gauge, DFR0576 Gravity Digital 1-to-8 I2C Multiplexer, DRI0021 Veyron 2x25A Brush DC Motor Driver, DFR0399 DC Micro Metal Gear Motor 75 1 w Driver, DRI0039 Quad Motor Driver Shield for Arduino, DRI0044 2x1.2A DC Motor Driver TB6612FNG, DFR0523 Gravity Digital Peristaltic Pump, SER0044 DSS-M15S 270 15KG DF Metal Servo with Analog Feedback, DRI0023 Stepper Motor Shield For Arduino DRV8825, DRI0035 TMC260 Stepper Motor Driver Shield, DFR0564 USB Charger for 7.4V LiPo Battery, DFR0559 Sunflower Solar Power Manager 5V, DFR0580 Solar Power Manager For 12V Lead-Acid Battery, DFR0473 Gravity Digital Relay Module Arduino & Raspberry Pi Compatible, KIT0098 Breadboard Plugin Components Pack, SEN0305 Gravity: HUSKYLENS - An Easy-to-use AI Machine Vision Sensor, For any questions, advice or cool ideas to share, please visit the, Cable Length from sensor to BNC connector:660mm.