Plastic pellets are great, but you can use small rocks having the same or lesser hardness as your load. Please Introduce Yourself, Special Creations (intarsia, glass, metal, etc. tumbler vibratory rock tumblers vibrating rocks Thats why I decided to mount the motor on the frame and independently from the tub. Oh, give me a home where the buffalo roam! In the video you sometimes see me use a clamp across the opening of the tub. But I know it will last a long time and just a few loads will pay for this machine. The, Rock Tumbling = Patience! A small induction fan motor with a 1 long piece of steel rod, larger than the motor shaft. I kept it so simple and crude because I was doing trial and error. As always start as with Steps One and Two, put cleaned rocks in the cleaned and fresh barrel to make a full load. However, sometimes large parts rub against the container or something like that and create bad spots. (kinda sorta). Once that is the case you are done with this step. Two motors are also more expensive than one and I belive that the industrial machines get custom made motors. tumbler homemade brass All in both a rock tumbler and a vibrating brass cleaner (great for brass metals with walnut and a little polish).
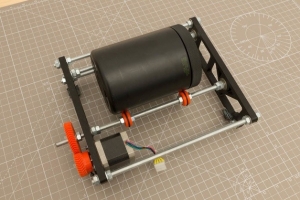
On ther other hand, the tub is very imple and should it wear through it would be a cheap part to replace. Make a balanced load that includes for large and small rocks. tumbler rock homemade polisher homemadetools wet advertisement thingiverse If you have a Rotary Tumbler we have instruction for those here.General Tips for Tumbling and doing Pretty Much Anything Else Belief that you can make something great Patience Attention to detail More Patience, grit kit designed specifically for the vibratory tumbler. tumbler vibratory tumblers homemade diy homemadetools plans advertisement rockbottom They can eliminate issues, but you could be lucky without one. Can't argue with the results. Avoid using unusually odd and non-rounded shaped rocks with the more common rounded shapes as these will be more difficult to sculpt.Rotary tumblers use a three step goal oriented tumbling process: Grind Pre-polish PolishBetween each of the four steps remove, thoroughly rinse your rocks, clean out the barrel and remove any grit or rock debris. That and it makes a bigger mess, and often leaves a "film" on the finished stones that can be difficult to remove. Many variations can be found in regard to tumbling instructions that make adjustments for different tumbling equipment and different types of rocks. That makes a lot of sense to me, but the space in my workshop is limited so I wanted to keep it as compact as possible. Of course, there could be multiple people that bought into a pool. That is there to keep the front side from flexing. What Motor to chose?I had a rough idea on how much power I would need, but no clue as to what speed would be right. Gather enough rocks to fill your barrel between 2/3 and 3/4 full.
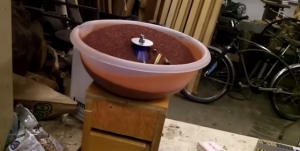
No need for keyways and super easy to assemble and tighten. The only drawback I can think of with Aluminium oxide is that since it is bright white, it tends to show a bit if it works its way into a hairline crack or fracture on the stone, but a good burnish stage and hand cleaning with an electric toothbrush will help minimize this. My VFD is from Yaskawa. tumbler vibratory homemade homemadetools advertisement polisher plywood This instructable is a guide on how to design a vibratory tumbler. So I went with the tub design. Some of them are already really pretty, but I would like to know what they would look like once nicely polished. If there is too little water, then the thickness of the mixture will prevent proper movement, thus slowing the polishing action. Thanks for watching! Fill the bowl of the tumbler about 3/4 full with your rock. It was on sale and it is made in Japan. The goal of this step is for all surfaces of your rocks to be well-rounded.Place rocks in the tumbler and add the 120/220 silicon carbide grit. Add water until it is just below your top layer of rocks. Repeat this step two more times.  Please Login or Register. That should also decrease the friction inside. Its 4mm mild steel. So I can be confident that it will work great. You'll lose your pants! Filler. I learned that shielded motor cables are important for VFDs. Rocks. On cordless drills you can change the speed by altering the voltage. Amethyst This site uses Akismet to reduce spam. Press the space key then arrow keys to make a selection. The grit may settle out of the mixture altogether. Yeah, but cracking all those walnuts would take forever! Ivory soap flakes are recommended. tumbler rock diy tutorial homestead survival own tumbling rocks money making instructables round jewelry polish They're so thick and heavy they wouldn't need glue. Okay, which one of you Illinois peeps won the $1.3 BILLION Mega Millions last night??? Never stop learning , I'm Trying to learn somthing new every day. tumbler diy A fork in the pockets worth two in the woods. The most important tips are standard. I couldnt find a lot of information on how to build one, so I experimented and here are my findings that hopefully help you. If you do not have sufficient rock to fill the bowl to the 3/4 level, then add plastic pellets or other filler.
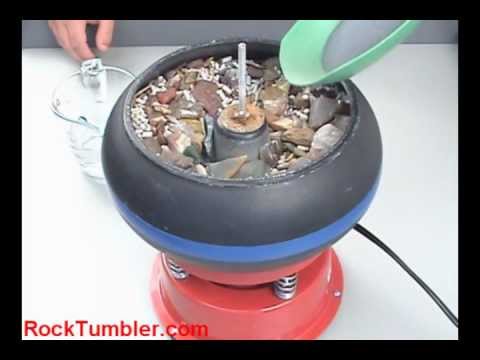
 Keep records, so if you make changes you will know the effect the changes had on the polishing. The Velcro connection to the plastic tumbler bowl was simply not robust enough to hold up to repeated use. Man, what a fun project. If you cannot find one as cheap as this, you can try sourcing one from farming equipment or from a car. tumbler rock coin (Comment Policy). Yes I had no idea about the springs. On the other hand, vibratory tumblers tend to be a bit more expensive than their rotary counterparts. Deeper pits, like a fold, should be cut or broken into two stones. Otherwise it would just run on full speed like a table saw does. Ficara has added details to 125KHz tag reader and contactless lock. Anodizing Aluminium In The Land Of The Queen, Why Fedora Decided To Give CC0 Licensed Code The Boot, Where Pollution Hits The Road: The Growing Environmental Hazard Of Rubber Tires, The Surprisingly Manual Process Of Building Automotive Wire Harnesses, Biomimetic Surfaces: Copying Nature To Deter Bacteria And Keep Ship Hulls Smooth. Hackaday Podcast 179: Danger Chess, Corona Motors, An Omni-Walker, And A Fast Talking Telescope, This Week In Security: Symbiote, Smart Locks, And CosmicStrand, Your Own Engineering Workstation, With Mame.
 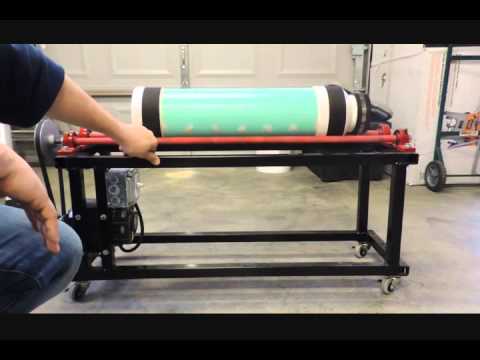 This is plastic media which is a little bit more leightweight than ceramic media. With 230V, you need a VFD. The tumbling generates dust and it needs to be washed away. How to connect aluminium extrusions? It kinda manipulates and changes the power as it comes in in such a way that the motor achieves a certain speed. You could of course mount the motor directly to the tub, but then it might shake itself to bits, or the shaft of the motor could break. So I didnt have to buy material and I got rid of scraps. So the tub has 10cm space to either side. Nice in fact and deed. Super neat project here! Emilio P.G. Soap flakes (not detergent). tumbler rock polishing thumler vibrating diy stone vibratory tumblers tumbling use rocks stones uv polish lot glass agate vibratory Without this setup, this machine would not run at all. Ultimately you are going to need a drain and a water hookup. I payed 1200,- for 150kg of media. Maybe even a complete square pattern out of ribs. rock tumbler rock homemade diy homemadetools tumblers vibratory binding wire tool injector repellant fertilizer stone tire advertisement motor The Grit to rock ratio here is 2 tablespoons of grit per pound per pound of rock. After watching it, your build is all the more impressive. Return the rocks to the bowl and proceed to the next polishing step with the next grit (see the Table). Contact the author for one-on-one help! In this case, its a cheap and easy way to get a vibration tumbler and the results are great. tumbler vibratory homemade rock homemadetools polishing barrels advertisement polisher I figured that I can change this with some pulleys if it was wrong. vibratory Your goal again in this step is to see that all the scratches from the first step are ground away, and the rocks have a smooth, matte finish. If you have the instruction manual that came with the tumbler, start out with those quantities. I chose a medium grit so it is rough enough to quickly remove a burr, but also not as aggressive to keep a smooth finish. One single ticket takes it all. Learn more, Building A Vibration Tumbler On The Cheap. Use left/right arrows to navigate the slideshow or swipe left/right if using a mobile device. Initial tests were positive, with the tumbler successfully polishing some cast brass parts using crushed walnut shells. tumbling This is really important as the coarser grits from one step will act adversely in proceeding steps,scratching rocks as you are refining them with finer media. However if you want variable speed, you need a VFD. I wasnt sure if I could weld it watertight on my own, so that was one unknown out of the equation. Win win. Presented here are general guidelines and the most common consensus on tumbling methods. I'm with IlanaI always use a rotory tumbler for the coarse grindsit's faster, it does a much better job of shaping, and it doesn't mess up the vibratory bowl. Please be kind and respectful to help make the comments section excellent. Most industrial machines have two motors on either end of the tub. The best I get is sanding with about #400 wet/dry. How to wire it up?If you are buying from a proper motor dealer, just ask them for advice. However, if 'time is money' and you want to retain more of the shape and size of the original material, then a vibratory tumbler may be just what you need. This is somewhat of a advanced build, so I keep this simple and only show the important details. These motors are not designed to have large radial forces on their shafts. tumbler rock lot vibratory tumbling does take polish rocktumbler rotary tumblers use example barrel produces You may be pulling some of the rocks out earlier than others as they will become smooth sooner and even show some luster. Use a bucket and a screen to collect used grit and slurry. vibratory wmv *Use a slow speed for all steps when polishing stones with Mohs hardness of 6.5 or lower (peridot, opal, lapis, obsidian, apatite, etc.). As for the welding - yeah, aluminum welding isn't as easy as steel. Would this work for polishing metalic pla parts? I didnt make this. There is a wide array on media out there. Citrine Share it with us! I'm new at this, though I have been collecting rocks for some time now (mostly agate and jasper). Use a pre-polish of either silicon carbide 500 or aluminum oxide 500 for this step, about 1 tablespoon per pound of load, and then add water up to the bottom of the top layer of rock. You might find the rock hardness information helpful on the Mohs Scale reference.Be sure to see our grit kit designed specifically for the vibratory tumbler. https://www.instructables.com/id/Bandsaw-Stand-OuHow big should I make the frame? All Tumbler Supplies Are In Stock Now - Shipping is Free Until 5/31/2021, The following are the most common instructions for general rock tumbling in Vibratory Tumblers to guide you. Otherwise I was affraird it would shake itself to bits. One final detail, its best to clean up now by cleaning your equipment thoroughly before everything dries and encrusts. The easiest way to add vibration to something is to do exactly what the $$$ bullet case tumblers use. Pick rocks that are of the same hardness and similar size ratio (the biggest should be no more than four times the smallest) to coordinate their development in the tumbling process. In my experience, CeO is better suited for use in hand polishing a piece using a wet leather pad than it is for use in any tumbler or vibe. You could also rivet the frame together instead of welding it. Simple barrel rollers are a quieter form of polisher old printer carriages work lovely to roll a length of PVC pipe full of parts & media, or you can just bolt any container to a slowly rotating motor to tumble stuff. For softer rocks, you may need to do a second pre-polish step or just keep them in a little longer.