What size was the finished countertop? Totally impressed with your project! kwR.W9(>qLKv`=??L| 0tYn8~KSx%Wt:KTzw\cPrw#`paBef
_`ifO/a-0`GXmVlnN'[|1 n3c0&'s1|DFPZOfB2P&/Xd9<9atXYnxj~QTjn>0+#%rAN;V6q0SV.LU)|Z74=}2)F`|{Y9c7Nqd= My mom doesnt cut on hers, but only because she doesnt want to have any scratches on it like a cutting board would. The downloadable plan comes with a supply list, cut list, written instructions, diagrams, and photos. Wish I had found your article before. Which put a hold on the kitchen project. Typically, do all wood shops do planing/sanding? Im thinking those would be fun Christmas presents. My wife has asked for a Maple Butcher Block Top island. Just so your question could be answered so you could look into that if you felt the need. 7usyWt;))`Q2 etNZb]hGPeg!4UbGRy\a]k:.#eHP0P//LCn11aB%e:O|:e Zf7/u+*l7\ The hard part would be finishing the sides and ends to make them look like a solid piece of wood. However, if you want to install a sink, dishwasher, or other appliances on your kitchen island, you will need professional help getting your kitchen up to code. 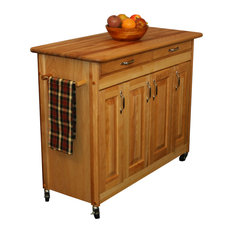 Or is it held ONLY by Titebond glue? Finally, the island got a slick coat of deep blue paint to add a pop of color to the kitchen. Thats a great question. When I got the table top back home, I used my orbital sander to round the edges and sand it completely smooth with 220 grit sandpaper. You also can use hardware to match what you already have in your kitchen. What I am thinking is having a section of butcher block counters flanking my range. The DIYer removed the existing top of the island and then painted it a rich gray. First, that island and the counter top turned out BEAUTIFULLY! A cabinetmaker and could not have done a better job myself.
I have one questionhow do you finish the ends??? Are they ?. Titebon III is pretty standard for cutting boards. We have a little too much counter to do with our purchased granite slab and dont want to spend $1100 on another slab for 2 square feet. Thanks! Nice work though, it came out very nice and your instructions were well explained. Before you start glueing, mix up a paste of glue and very dry sawdust(sanding dust from the wood (dry on a radiator) as a very fine paste, and keep handy, it should be as thick as you can make it, like wet toothpaste. I plan on using a hand planer for the top which I have never done and then finish it off with a belt sander. I went back and forth, fretting over whether to build a butcher block table top or to buy one. Some of these pieces span the full 5 length of the counter and some are shorter pieces. They only offer it in the standard depth 25 so you wouldnt be able to make such a big island. It would swell back into the banding and be tighter than he could ever do with clamps. 4g In case you missed it, I did still build the entire kitchen island all by myself, so Im not sure where you are coming up with the lazy part. It has two cupboards with shelves, open shelving, and lots of drawer space. I love that it has the wooden counter top. I seriously love to hear your comments, so please let me know what you think! . You were extremely smart taking it to a local woodworker shop to sand smith and even and to cut to size. I got all of my clamps lined up and went to work. I did not fill in those holes, because they are virtually invisible being that they are at the top of the cabinet base. I never said this was 100% DIY and didnt hide the fact that I had my local hardwood shop do some of the work. This significantly cuts down on the hard dried glue that sits on the top to be removed later. This post contains some affiliate links for your convenience. Can you tell me how your were reading my post? We got maple hardwood flooring for free from one of the schools that was redoing the gym floor. Having a small kitchen doesn't necessarily mean you don't have space for an island. LYa-Yflg''E\\qBYAe,C8h0\3{]h'hY`9NnPMvrc2:3y6ge5%>}d -Acy\!r4Ixk[eaMA|7lsbyKHE lsz@`YXJ\%o4ZQ'o4iTLV'k@P R[:50a^d~o;Y abqaCc)Wc rNxh =[WbJ2TPaz$$ J_g.Pa)ZL4T+W8, ll4 H! @0wm k|sd)p? A. Its been a few years, so its hard to remember how much I used. The beauty of building a kitchen island yourself is you can modify the plans to adjust the island size, finish, and other aspects like accompanying stools or seating. ^TbZ1Zj59 ^f^fp@]YZc!L Everyone is certainly entitled to their opinion, but to call it lazy is rude and uncalled for. I would loosely clamp everything and then tap each end of the butcher block to get the joints tight together, then tighten the clamps. So after adding a base to raise the islands height, they attached cedar planks to the island in a design similar to a barn door. The average size of the countertop overhang is standard, usually 1 1/2 inches. This is the bottom side. The whole process actually didnt take too long. Thank you. Lol! Your project turned out nice but a butchers block is made from end pieces. http://www.ikea.com/us/en/catalog/products/20274961/#/60274964, http://blog.hgtvremodels.com/2012/11/06/non-toxic-butcherblock-countertop-sealer-for-a-food-safe-kitchen/. Its been 4 years, so it is difficult to remember. The butchers grandson has it in his kitchen. If it makes you feel better, I did build the entire kitchen island it went on all by myself. I took it back to get a nice even surface on it. The only problem with the IKEA butcher block is its particle board in the middle. Then clamp tightly using clamps on the bottom as well as the top. With all that glue, is it the type that will not affect food or cause caustic reactions on some foods? The desk also got a formica marble top that matched the rest of the kitchen. A DIY butcher block will hold up fine. http://www.ikea.com/us/en/catalog/products/20274961/#/60274964. This island can easily be customized with paint and/or stain to match any kitchen style. You only used butcher block conditioner or did you have to stain it? And, if you plan to add seats, for instance, four stools on one side, plan on at least having 20 to 24 inches of countertop length per stool. Are Titebond Glues safe to use? I got them for $2 to $5 a piece at a reuse center. Was it on your computer or a mobile device? Your project came out beautiful! It just takes time and practice:). I turned the boards to the side I wanted to glue and started laying it on. It looks awesome. When sticking the pieces of wood together, use a mallet to pound any shorter pieces into a tight joint. Congratulations! I bought shorts from my favorite wood shop in 7 different species of wood including some exotics. There is one called the HAmmarp that is indeed just solid wood so it is more expensive than the particle board versions. I wanted to know, did you put biscuits between each of the wood pieces with a planer? Im not sure whether to thank-you or curse you for showing this. Thank you for sharing this.
Truth be told, there are a couple of tiny gaps where the ends didnt join perfectly together. He would do these jobs in the winter ; take the wood out, joint them up, band them in steel, with bolts every 18 if it was a big block, the corners held ends together. Thank you! The cheapest I could find a maple butcher block in this size was $300 and that was buying online, but theres no guarantee we wouldnt have had to send it back for defects, etc. The DIYer wanted a rustic look. Im just not sure how much oak id actually need if the top were going to be 25 w x 48 l. Id have to look for the receipt to figure out the board feet, but the finished top is 3x5. After applying the butcher block conditioner on the bottom, did you wait for it to dry, then flipped the block over on the sawhorse and apply the conditioner to the top? Great job on this DIY project. The best size for a kitchen island depends on your available space and needs. CS__"YX5u]
Really?! Great price though. On the second night, I finished putting all of my pieces together and enlisted every long clamp we had in our garage to make sure those joints were tight. It can be stained or painted to match just about any style of kitchen. Either way, both islands will add functional and stylish storage and prep space to the kitchen. The design includes a large workspace, a lower open shelf, wheels to make the island portable, and a towel bar. I just made sure to take extra care to put more of the conditioner in those little gaps. Ive thought about doing the same in my laundry room. I dont believe that takes away from the DIY factor of this project, but were all entitled to our own opinions.
Thats a great deal! This huge farmhouse kitchen island from Ana White is loaded with storage. As promised, today Im going to show you how I built the butcher block table top for it. Ive found 24 x 96 butcher block counters at Floor and Decor for around $180 for maple, which is a great price! Thanks for posting your tutorial its helped convince me that this is definetly doable with my skill set. Nice job! For ease, you can make a kitchen island out of stock cabinets as the base and finish it with a countertop. Here are 20 free DIY kitchen island plans to inspire you. And the two large shelves below offer ample storage. A kitchen cart offers the counter and storage space of an island paired with the flexibility of being mobile. From there you can cut it up into just about any size you want, leave it a large slab, or even have it milled down to 2 as well. If I were to change one thing, I would probably put a more permanent coating on it, but that would be it. They offer a great piece in the birch wood for about 195 bucks and then just cut to size, sand it and shape it! I love that you did this from scratch and shared the details. You may not alter the images, remove watermarks, add text, or remove text from the images used. Q% AnE~?,Js %I!Q]KF 5FI+-4D&ZdHSU%$a(%|/*pc y6DMydW\-7i9YxDSKf` dQ@`EcEA+ Filed Under: Furniture Projects, Projects Tagged With: alder butcher block, build you own butcher block, butcher block, butcher block kitchen island, diy butcher block, diy butcher block kitchen island, how to glue up butcher block, knotty alder butcher block, titebond III. That looks great, Im amazed at how good it turned out. Ok, this is a design question as much as anything. Very beautiful, thank you for sharing this. Once I got the entire thing glued up, I left it for 24 hours before taking it in to be sanded. It was faster than using my belt sander and smoothing it all out. I hope that makes sense. Bette @ somerset lane recently postedFEATURE FRIDAY: Life in Velvet. I think Im understanding what you are asking, but if I am wrong, please let me know.
Yes, its been nearly 3 years and its still going strong! I was wondering if you used a stain on your wood, I did not see you mention it in your blog.
But, turned out better than expected. Any estimate on how much it might cost to make a 3286 top the same way you describe? We are about to start our own kitchen reno, and have discussed to great lengths the idea of building a kitchen island. Wow! I would say a sealant like Rubio Monocoat would be perfect for this. Kitchen Island With Pre-Built Panels and Butcher Block, Rustic Kitchen Island With a Galvanized Metal Top.  This free DIY kitchen island plan from Designs by Studio C builds a large island complete with two storage shelves, a push-through drawer, and a double-sided cabinet. What you said is exactly why I decided to build the top for this. I added corbels to this one to offer more support for people leaning. You can see that the conditioner really brought out the warm hues of the alder.